First a little yeast info--- Don't be dismayed, there are a few solutions for your bread baking needs. Did you know that yeasts exist in the air and you can capture them, grow them and preserve them under refrigeration, then bake bread? Let's go back 3,000 years or more to Egypt for beer, yes beer! In brewing, yeast is what turns sugars in barley, wheat and other grains into an alcoholic brew. Back then the yeast was wild and in the air, it still is! Brewers combined the grains with water and sorghum and cooked it to extract flavors (hops in beer didn't appear until the 1100 or 1200's). Some of the wild yeast in the air survived the cooking and a slow fermentation began. More wild yeast got in because the vats were open. All grew because of warmth, plus it had sugar and starch to eat---yum! It sat for days in the open vats covered with cloths, it started to bubble and foam.
Just like brewing beer today, after a 3-4-5 days the fermentation slowed and came to a halt. Then the brew was transferred to clean vats to age, ferment more and develop flavor. During this second period of fermentation, sediment in the soon-to-be beer dropped to the bottom of the container; this was both dormant and dead yeast cells from the fermentation process. Foam was skimmed off the top of the fermenting wort, to save, because it also contained many live yeast cells. It was learned that this slop, yeast sediment and foam, when added to flour, caused yet another fermentation, this time in the dough. After mixing, the dough increased in volume and thus was baked into bread! Ah ha, fermentation of dough was discovered. Well it wasn't just the beer yeast, the same happened with wine making...yeast fell to the bottom of the container, and was reused in baking.
Through history, until the true cultivation of modern day baker's yeast, bakeries were always located next to the brewery or winery because of the availability of yeast. But then in the 1870's, thanks to Louis Pasteur, yeast was cultivated with scientific accuracy. First used in beer and wine making, it was then brought to the baking world. All this aside, a basic sourdough starter is nothing more than wheat, rye or barley flour mixed with water and set to ferment for about 5-6 days. Wild yeast grows and voila, after a period of time it becomes a suitable leavening agent. Yes it needs to be stirred, and fed with more water and flour to keep it vigorous. Bread made with a real sour starter does take more time to rise, 6-8 hours, before going in an oven. The dough is handled a bit differently than yeast-risen dough. With sourdough, after mixing, you don't need a double proofing, or as much kneading and shaping and forming associated with the yeast-risen bread. Like all bread, sour dough bread dough is mixed to develop gluten; it then is shaped and left to rise for a period of many hours and then baked. In a commercial bakery all the rising just isn't done because it isn't efficient. There might be some artisan bakers that do the extra steps I just mentioned, but in reality a baker needs all the space in the bake shop for other production. If you want to do it at home, plan on 2 or even 3 days of slow fermentation, use of refrigerator space and potential accidental issues such as deflating the dough before you bake it---is all this worth waiting for? The answer to me is no it isn't, it's a proven waste of time to go through the process. So now that you know this and you can't find yeast in a store, you can make a sour dough starter instead but plan ahead.


But what if you don't like that sour taste? There are a few baker tricks to tone it down that you can explore on your own. Just as there is yeast for baking there is yeast for brewing beer and for making wine. Each variety was scientifically developed to bring out specific flavors in different grapes and in beers, and not to die in strong levels of alcohol, but it's still yeast and it will leaven bread just the same! Even brewer's yeast can be used and all can be cultured at home and kept on hand in a refrigerator or freezer for a long time, as long as you revive it by regular feedings of water and flour. If choosing to buy beer yeast at your local brewing store, keep it simple and get a yeast for brewing ale, if you get a wine yeast try dry wine yeast/Cotes de Blanc because you won't get chemical and fruity flavors in the final product. Also know that beer and wine yeasts are sold in packets like baking yeast and are about the same price---1 buck a pack. And then there is always Brewer's yeast, a bi-product of beer making. It's different than specific wine and brewing yeast. It's the leftover yeast cells and even the foam that's harvested during and after the brew is complete. It's processed and dried and sold as not to be wasteful. It is often used as a nutritious dietary supplement for humans and animals. Now you know you can also bake with it but beware that it might give a slight bitter taste to your loaf of bread or sweet roll. There are many different ways to start a yeast culture A/K/A sourdough starter; from grapes, pineapple juice, potatoes and from some baking yeast itself.
Going an all-natural way---here is a basic recipe for a sour starter to be used for French bread, a rustic round loaf or rolls. It will take about 5-6 days depending on the temperature in your house before you can make bread with it so plan ahead. As just mentioned there are thousands of recipes for sourdough. I'm a fan of starting with rye flour and then feeding it with white flour and water, just be sure to use water with no chlorine in it as it will retard the growth of yeast. I also try to keep a 1 to 1 ratio of flour and water by weight! Please try to do the same and follow the recipe.
Day 1: Start around 9 AM---In a glass, plastic or stainless steel mixing bowl, mix 1 1/2 cups (225g) of rye flour with 1 cup (235g) spring water (at room temperature) until all of the flour is mixed and there are no lumps. Cover the container with a clean damp cloth and loose covering of plastic wrap. Leave at room temperature 68-70 degrees F for 24 hours. (Why rye flour and not white? You can use either but it is well know to bakers that rye flour contains certain enzymes that help create a very strong starter.)
Day 2: Around 9 AM---You will see a few bubbles and some foaming action on the surface of the mixture. 1st. feeding---Now add 1 (150g) cup of unbleached all-purpose flour and 1/2 cup + 2 T (150g) of room temperature spring water and mix until all ingredients are evenly distributed. Prepare a new clean non-reactive container, like you used in the first step, and scrape the mixture into it. Cover tightly with plastic wrap and cut a 1-inch slit in it with a sharp knife. Let sit at room temperature for 24 hours. *A helpful hint---feed your starter the same time every day---here it is 9 AM..)
Day 3: Around 9 AM ---There will be noticeable activity in the form of bubbling and you will smell a sour aroma. (To discard half of the mixture or not, before another feeding of more flour and water---a debate goes on of the value. Or save that amount and make a second batch from what you are removing. Rather than being wasteful and throwing it away you can simply grow two batches and then give some to friends, or freeze it. If you choose this, you will have duplicate starters to work with and you will need to feed both batches from this point on!) After you master the basics you might not want to throw it away, but for this formula it's going in the compost. So let's make it easy and not be confusing, let's use the discard a portion method! Remove about 1/3 of the starter (125g) and mix the rest with 1 cup (150) of unbleached all-purpose and 1/2 cup + 2 T (150g) of room temperature spring water and stir until smooth. Put it in a new clean container and cover tightly with plastic wrap and cut a 1-inch slit in it with a sharp knife. Let sit at room temperature for 24 hours. FYI, your portion of starter should now weigh around 600g +/-
Day 4: Around 9 AM---The mixture should have at least doubled in size at this point. FYI, if it seems to be sluggish and hasn't doubled in size, allow it to sit at room temperature for another 12 to 24 hours before feeding again. Otherwise, repeat instructions for steps above---but now discard half of the mixture, (300g). And mix in 1 cup (150g) of unbleached all-purpose and 1/2 cup + 2 T (120g) of room temperature spring water and stir until smooth. Pour into yet another clean container and cover tightly with plastic wrap and cut a 1-inch slit in it with a sharp knife. Let sit at room temperature for 24 hours. FYI, your portion of starter should now weigh around 600g +/- if you follow the math!
Day 5: Around 9 AM again---Feed the starter twice (2 times) today! The first feed is at the regular time and then again after 12 hours or around 9 PM. The first feeding in the AM is: 1/2 cup (75g) of unbleached all-purpose flour and 1/4 cup (60g) of room temperature spring water, and stir all together until smooth. Cover with plastic as you have done before. Let sit at room temperature 12 hours. Then at 9 PM, feed the entire batch another 1/2 cup (75g) of unbleached all-purpose flour and 1/4 cup (60g) of room temperature spring water and stir until smooth...cover with plastic wrap as before. This schedule should put you in a time frame for mixing dough the next day. The starter should now weigh around 870g.
Day 6: bread baking day: Around 9 AM---If your starter has been active and doubles in size between feedings, then your starter is ready to bake with. But how much should you use??? This takes some calculating and note taking so you have a future reference on what you did, later you can adjust accordingly. Suggestions abound on the Internet. To make it simple, once again remember the fact that sourdough products are slow risers and are not like using a package of yeast where dough rises in a few hours. Starters are not equal in proportion of yeast cells to a package of yeast in volume. To avoid a calculator and figuring to the decimal points use my simple rule of thumb---that's use 22% in weight of the total weight of your recipe (see recipe below). Use what you need in your recipe and then put the remainder in a jar with a tight fitting lid, but feed it again first! If you followed the proceedure and didn't have any errors in measurement or accidents, you have around 870 grams of starter. Put the remaining starter in a clean container and feed it using equal weights of flour and water. If your bread formula used 240 grams of starter, then feed it with 60 grams of water and 60 grams of flour mixed in well so there are no lumps. Pour and scrape it into a clean jar and screw on the cover before refrigerating. Attention please! From now on you will need to keep the starter in a good state of being with a weekly feeding, I do mine every Wednesday. I take it out of the refrigerator and let it warm to room temperature (70F) overnight or about 6-8 hours. My schedule of baking allows me to remove around half of it and use it for a few loaves. I then feed what remains with equal weights of flour and water. If I used 120 grams of starter in my bread formula, I replenish with 60 grams flour and 60 grams water. If I use 200 grams, I replenish with 100 grams flour and 100 grams water. I stir it smooth, wipe down the edges of the jar and and let it sit out until I see it starting to grow. At this point I cover and refrigerate it until the next Wednesday cycle. For whatever reason if you don't bake weekly like I do, you still need to feed it on a regular schedule and if that's the case, you may choose to discard half the starter and replenish what remains using the 1:1 ratio. You may also freeze half putting it into a dormant state. To use it from this frozen state, defrost it two days before you need it and feed the night before, following the flour to water ratio as above. When you are ready to bake more bread, take the starter out of the refrigerator the night before to warm to room temperature and feed it before bedtime, then cover the container. It will be ready in the morning for more bread baking. To keep it going for as long as you like, just keep repeating the process and keep it in your refrigerator. FYI there are starters that have survived many years using this method. Please try to keep your storage containers clean!
A sour starter can be used in
so many ways, just think of it as the flavor of your
location. Ah, that's why San Franscisco sourdought is
unique---
*Special Note: The following
dough will be wet, probably wetter than what you are use to.
You will have to kneed it to develop good elasticity, do so
so with as little additional flour as possible and try not
to deflate it, you want to make nice shiny, plump dough
balls for shaping into rolls or loaves.
Basic French bread dough water to flour (hydration) on this recipe is about 60% (Using about 1/4 of the sour starter) 22% of sourdough starter, to figure this add the weight of ingredients and multiply it by 22% to get weight of starter needed (375g + 650g + 10g * .22) = 227.7g)
The Recipe...
sourdough starter---(so call it 230 g)
1 1/4 cup (375g or 375ml) lukewarm water, 100 degrees F.
unbleached bread flour 5 1/4 cups (650g) + 2 T for forming/shaping (use at least 11.5% protein flour)
1 tablepoon salt (10g)
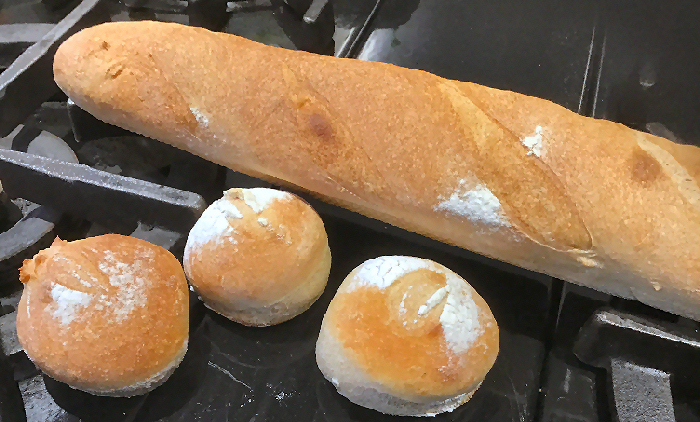
The basic recipe makes 3 Baguettes or 2 Batards or if you like about 36 nice size Rolls. You will mix the dough as normal---at least 10 minutes on speed 2 of a 10 speed Kitchen Aid mixer with dough hook to develop the gluten, then let it rest for 30 minutes before dividing and kneeding. Kneed 20 times with sufficient pressure to form a tight round balls---be sure to use just enough flour to coat the ball well---let rest again for 30 minutes covered with a cloth. Set in a proofing basket if that's your style. For baguettes/batards/rolls use a couch and let it rise in a warm humid spot for 3-4-5 hours---rolls not as long, depending on your kitchen enviorment. For slashing (docking) I will do that very carefully after they have been transfered to lightly floured peels, be careful not to deflate the loaves.
Bake at a solid 450 degrees F. on a stone if possible or on steel baking pans. Baguettes bake for 18-20 minutes, Batard for 25-30 and Rolls about 12-14 minutes. (A little secret---you might want to add 1 T diastatic malt
for additional light-texture---no need to change anything in the recipe.
Bake with steam for a crispy crust!)
 Homepage
Sitemap
Site Search
Homepage
Sitemap
Site Search